I made another pocket potholder. All of the sewing and quilting was done by hand.
This was my first attempt at marking a quilt top to do a fancy quilting design rather than stitching in the ditch or following a design printed on the fabric. Among other things, I learned never to use Fons & Porter's white mechanical pencil leads to mark a quilt top. They did not wash out.
There is a huge gap between my window blinds and the wall that allows people to see into my apartment when the blinds are closed. On one side, the only thing anyone could see is my boxes of needlework projects and supplies, and I've been blocking the other side with a bookcase. However, I want to get rid of the bookcase, so I had to come up with something to cover that gap. Since I live in a rental, I couldn't simply install a curtain rod over the blinds.
So, I made curtains to cover the gap, and got creative about how to hang them. One side is tied to the blinds with a length of yarn, and the other side is nailed to the wall (we're allowed nails to hang things).
I cut out a long, skinny rectangle of fabric and hemmed the edges.
Then, using a sharp tapestry needle, I sewed a length of yarn through one layer of fabric in the hem so it wouldn't show on the front, and knotted the ends of the yarn to keep them from fraying. (I realize it's difficult to see in this photo since everything's black.)
Finally, I nailed the curtain to the wall and tied it to the blinds. It took me a few tries to get it right, but I managed it in the end. Hopefully the second one will be easier now that I know what I'm doing.
I've finished another Swedish weaving/huck embroidery towel. This one's based on Peaks and Valleys from Learn to Make Monk’s Cloth Afghans by Marilyn T. Magly.
People often ask where creative people get their inspiration. Sometimes it comes from sheer frustration.
I had a typical store-bought laundry bag with a drawstring closure that I would wash every time I did the laundry so that I could put my clean clothes in the clean bag. The washing machines in my apartment complex are poorly designed and have a huge gap under the agitator that allows the machine to "eat" items. One day, the machine ate the plastic toggle on my laundry bag's drawstring and no amount of pulling and wiggling would dislodge it. I had to cut it loose. This is the second drawstring that I've lost to these machines. My anger at the thought of having to make yet another drawstring for this bag sparked my creativity. I had 2 problems to solve: 1) the bag's closure kept being eaten by the machine, and 2) store-bought bags are made out of cheap material that wears out quickly (this one was already showing enough wear that it probably wasn't worth fixing it again). So, I decided to make my own bag out of cotton duck cloth with a snap closure rather than a drawstring.
It's a very simple design. Using my old bag as a guide for size, I cut out a large rectangle, sewed a 2" hem, folded the rectangle in half, and sewed the side and bottom seams (I used a 1/2" seam allowance). Then I sewed the snaps to the hem. The finished size is about 30" x 39". The snaps are size 10 (1") and are metal rather than plastic. I sewed it by hand with cotton hand quilting thread, and in addition to cutting it out with pinking shears, I finished the seams by folding the seam allowances in toward the center and sewing them together so that all of the raw edges are fully enclosed. This thing is very durable and should last me a good long time. Also, the fabric was on sale so I bought enough to make 2 bags. When this bag eventually bites the dust I can salvage the snaps and sew a new bag. I'm never buying one of those cheap bags again.
I've finished Shamrock Kitty, a Mini-Kats™ design by Linda Connors of Calico Crossroads®, adapted from the artwork of Kathleen Kelly of Kats by Kelly™. This is one of the Kats that I had finished stitching before I started this blog.
As always, taking a photo of a large item like an afghan was a challenge. I ended up standing on my couch and leaning as far back against the wall as I could. I don't know how I'm going to photograph afghans and quilts once I get rid of the couch (which is happening soon, I hope).
In my efforts to help out the environment by replacing as many disposible items with reusable items as is practical, I've been on a quest to find good reusable dish sponge.
I've been using these for a while. The scrubby side is made from a plastic fabric with raised white plastic dots.
The back is terry cloth, fiber content unknown.
These can be washed in the washing machine, but as you can see above, the plastic fabric splits and has to be mended. Also, the plastic foam sponge inside does break down over time and eventually these need to be thrown out, adding more plastic to the landfill. Also, the white dots fall off in the washing machine or while I'm doing the dishes, sending microplastics into the water system. Altogether, these are not an ideal solution.
Thinking about this recently, I realized that the scrubby side doesn't actually do that good a job of scrubbing. I've essentially been washing my dishes with cloth. And, since I'm good about rinsing my dishes right away and setting them to soak in soapy water, I don't actually need to scrub them. So, I decided to try my hand at creating my own dish sponges out of some sort of fabric.
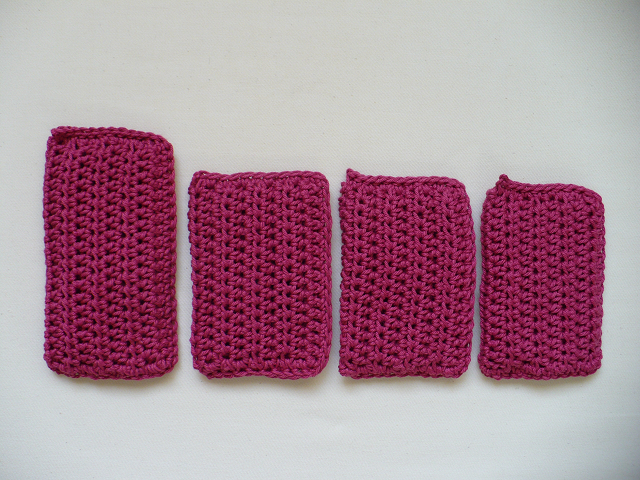
Using one of my existing dish sponges as a guide for size, I crocheted a rectangle that when folded up would be the desired thickness, folded it in thirds, and then crocheted the edges together.
The first sponge in that image demonstrates why one should always make a gauge swatch: even though my foundation chain was the same length as the old dish sponge, by the time I got through crocheting my rectangle it had grown quite a bit! I used the oversized sponge as my gauge swatch, adjusted my stitch and row counts, and made 3 more sponges, this time the right size. I used hdcs to make the rectangle because they work up fast and make a nice pattern on their own.
I just used one of these to do the dishes, and it did the job just fine. There was even an unexpected advantage: it was much easier to rinse the soap out and wring out the sponge than with the old model.
As a final note, I can never wring out my dish sponge without thinking about this episode of Frasier:


